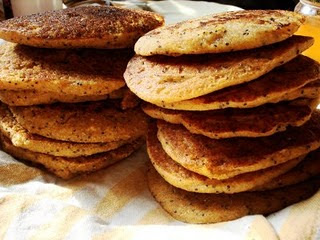
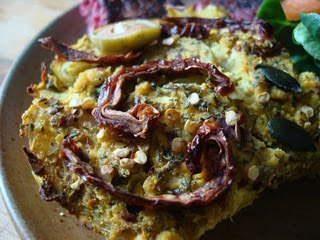
Showing posts with label bread. Show all posts

Recycled Bread 2: Kvass-Potato Paprikash

>> Wednesday, February 25


i
I guess Russia just invaded Hungary. Either that, or I am feeling sentimental about all the potato paprikash I ate there, and I want to recreate the experience with the things I have available. Primarily: leftovers from making kvass, a Russian drink made from stale bread soaked in water, sugar, yeast, mint, and lemon. The leftovers are a ball of mushy bread goo, and I couldn’t think of anything better to do with bread than make, um, bread. Next time you try out kvass-making, you know what to do next. Of course, you can make this bread without the kvass mush too. Substitutes are listed in the notes.

Kvass-Potato Paprikash Bread

As with my other recycled bread, this is a fairly dense loaf. It can stand alone as a hearty breakfast slice, but still makes a great sandwich, or a delicious appetizer sliced, roasted, and served with vegan mint raita.

Ingredients:
2 cups leftover mush from making kvass*
1 cup cornmeal SD starter
½ cup water kefir
2 tbsp molasses
2 tbsp kimchee brine (or water with salt and garlic)
2 potatoes, 1 grated, 1 chopped in thin slices
1/3 cup chopped leek
¾ cup polenta OR ¼ cup polenta and ½ cup recycled grain (leftover rice or something)
2 tbsp nutritional yeast
3 tbsp sweet or medium paprika powder plus some for garnish
¼ cup canola oil
2 tsp baking powder

Directions:

  1. Mix the sourdough starter with the molasses, polenta/polenta+grain, and water kefir. Leave covered in a warm place for 12-24 hours.
  2. Preheat the oven to 375 F(190 C)
  3. Mix in everything but the oil and combine very well.
  4. Heat the oil until bubbly and mix it quickly into the dough.
  5. Scrape the dough into an oiled, floured casserole dish (makes a cornbread shaped loaf) and garnish with paprika.
  6. Put in the oven and reduce heat to 350 F (175 C)
  7. Bake for 30 minutes or until the loaf begins to come away from the sides. Cool before slicing

Notes:
*Subsititute: a leftover cooked grain, blended up into a thick mush (don't add liquid) would work fine, as would mashed potatoes and some flour. Or add another grated potato and enough flour to get a good consistency. Or, combine the above ideas.

Read more...

Recycled Gluten-Free Bread

>> Saturday, February 7


If when you think “bread” you think flour, yeast and water, it’s time to spice it up a little. Almost anything can be made into something “breadlike” with a lot more nutritional value, flavor, and variety of texture. The recipe here is one version of a recycled food bread, which I tried to make as general as possible so you can fill in the blanks with you own ingredients. Nothing about it is set in stone; I never measure for this one, and it’s different every time I make it. That’s just the nature of recycling food-always interesting and unique!

In general, this usually creates a dense, small, moist loaf. It has no added yeast and rising is not really the goal, just fermentation of the ingredients for easier digestion. Sometimes I add some baking powder before baking to help it fluff up a little. If I have mostly veggie ingredients, I tend to let the loaf stay completely unleavened and bake on the lowest temperature setting for up to 8 hours. The result is something like vegan meat, which, because it contains live bacteria, keeps for literally months in the fridge. That particular version is great marinated in a little miso and garlic, then sautéed with fresh veggies, or crumbled over spaghetti as ground beef. Yum!

Recycled Gluten-Free Bread

Ingredients:
Sourdough starter:
1-2 cups GF flour,
2 tsp guar gum (opt)
1-2 cups water, water or milk kefir, or yogurt

Grain ingredient can be 2-3 cups of one of the following:
Leftover cooked grains, like rice, quinoa, polenta, etc
Leftover bread mush from making kvass
Stale bread, chopped, roasted to dry, and soaked in the liquid ingredients
Leftover pasta
Sprouts
Up to 1 cup of flour, if desired, for binding

Veggie/Fruit Ingredient can be 1-2 cups of one of the following:
Pulp from juicer
Old grated salads, especially if too dry to enjoy
Leftover mashed potatoes, or other creamed/cooked veggies

Liquid Ingredient can be 1-2 cups of one of the following: Soy yogurt
Soy milk kefir
Water kefir
Tahini and water
Kimchee brine or other pickling brines combined with water (if you use a salted brine, add it at the end to let the yeast do it’s work first, and moisten initially with clean water)

Other Ingredients include the desired amounts of any of these things:
Extra flour
Herbs, spices, sautéed onions, garlic, or other flavorings
Activated seeds, nuts, or nut meal (flax meal soaked in warm water as an egg replacer works wonders)
Water
Baking powder
Yeast

Directions:

  1. Mix sourdough starter ingredients in a clean bowl or jar, adding more or less water to get a sticky, moist, stirrable batter. Leave in a warm place for 1-3 days, until fluffy and bubbly.
  2. When the sourdough is ready, mix up the grain ingredient, veggie/fruit ingredient, and liquid ingredient (leaving out brine for now), adding more or less of the liquid ot get a spongy, very moist dough. Stir in the sourdough starter and leave in a bowl covered with a moist towel for 8-24 hours in a warm place
  3. If it hasn’t risen at all, the sourdough didn’t like something very much in your mixture, could be too much salt in the grains. It’s not important though, other bacteria are there working for your bread!
  4. If desired, sprinkle baking powder over the dough and fold in, or dissolve yeast in warm water and mix in, to have a leavened loaf.
  5. Fold in any seeds, nuts, herbs, spices, etc. that you would like and add the brine if using. Cover with any toppings for decoration that you wish
  6. Bake in a bread-loaf form for 2-8 hours; quicker for more grainy, leavened breads, and longer for mostly veggie or sprout breads, to get a dense “vegan meat”


Read more...

Gingerbread Pudding (The Rebaked Cake)

>> Tuesday, February 3

After making something Swiss to fill my cultural craving bracket last week, I forgot to plan for the fact that everyone I know is doing the usual winter hibernation routine still. Hence, no one has been around to help me eat it! Yesterday, noticing that it was looking less moist than I like, a food I haven’t had for years dawned on me: bread pudding.

In fact, I haven’t had it since middle school, when Anne, my most beloved school cook served it up with brunch one day. I was intrigued, but not really excited. How good could mushy bread taste? Mind you, I went to a tiny charter school and the food was all fresh-cooked each day by Anne and the students with as many local, organic products as possible, so this was no ordinary school-bread-pudding affair! Still, I was skeptical, and have been ever since. Since 8th grade, a lot of my opinions about food have changed. One of them is that I now think recycling food is about the coolest thing you can do, for the world, the creative cook in you, and your friends and family. Another is that if you enjoy something in one form, there's always room for innovation.

So, I began surfing for recipes and stumbled on this one by Chris at Eat Air, which I used for the inspiration to make a nice creamy base with silken tofu. Because the original cake I made was the Tender Elstar Apple Cake, I needed something to compliment the cinnamon-apple flavor, yet change and enhance it so no one would know it was the same thing they'd eaten yesterday. I went for darkening and saturating the spicy-sweet nature of my corn-cake by adding molasses, gingerbread spices, more apples, and vanilla. The result was…Well, I can’t put up a picture to show you, because we ate the whole thing in about 24 hours flat and there was never a moment for a picture without reaching hands involved. Great. The word "great" comes to mind.

Forget everything gourmet has ever taught you-this bread-pudding is as luxurious as the finest French mousse.

Gingerbread Pudding (The Rebaked Cake)

Ingredients:

  • About ¾ of a Tender Elstar Apple Cake (or 1 loaf bread*)
  • 2 juicy apples, washed and chopped into chunks
  • ½ cup raisins
  • ½ cup raw sugar
  • 2 tbsp molasses
  • 2/3 cup silken tofu
  • 2 cups soy kefir (or soy milk, or soy milk and some yogurt)
  • 2 tsp vanilla extract
  • 4 tsp Lebküchengewurze, if available. If not, the following:
  • 1 tsp cinnamon, ½ tsp nutmeg, ¼ tsp ground cloves, ¼ tsp ground coriander, 1 tsp ground anis, ½ tsp ground stern-anis, 1 tsp fresh grated ginger(or some creative combination of the above)
  • ½ finely chopped fresh vanilla bean (optional, but fabulous)

Directions:
  1. Cut the cake or bread into coarse chunks and dump in a large mixing bowl
  2. In a blender or with a hand-mixer, whip the silken tofu until smooth
  3. Add the kefir/milk/yogurt and combine until smooth
  4. Stir in vanilla extract and bean, sugar, molasses, and spices, then pour the mixture over the bread and fold together. You should have a nice, moist batter, but not too runny to set while baking.
  5. Fold in raisins and apples, pour into a greased, floured casserole dish and bake at 175 C (350 F) for about 30-35 minutes**.

Notes:

*If you use bread, chop up some activated almonds, pecans, or walnuts and add them, since the crunchy nut pieces from the cake really add to the texture!

**It is finished when it is still slightly gelled on top, not totally set. When it cools it will be just firm enough to resist your spoon, which is how I prefer it. It’s still sliceable and cake-like, but spongy and springy.

Read more...

Mom's Skillet-Baked Cornbread

>> Monday, January 26

My mom grew up in America's south and southwest, and her cooking has always maintained a hefty southern tang. From Mexican-inspired dishes like enchiladas, black bean soup, chili, and tostadas, to classic American dishes like baked yams, chicken-fried steak, barbecued ribs, and sour bean salads, guests at her table have never gone unsatisfied with her simple, hearty cooking. And mind you, rarely was there a meal that didn't involve one of her heavy old cast-ion skillets. "Girl's gotta get her iron," she likes to say, "and that's not exactly what comes out of teflon."

She and I both started eating gluten free around the same time, and I slowly moved towards veganism-this meant a lot less of those favorite meals I had always had-fried wheat noodles with yeast and soy sauce, homemade gluten-meat, and beef stew. For a while we nibbled sadly at what was sold to us as gluten-free rice bread, and chased the crumbly mess with warm rice milk hot chocolate, reminiscing about the days of baking muffins together early in the morning, and catching the first whiff of rich molasses buns on rainy evenings Dark times, that's all I can say.

The Renaissance bloomed when we realized that what we needed were not necessarily imitations of gluten-containing products, but naturally gluten-free things that we could enjoy just as they were. Suddenly, cooking was magic again. And one of the most magical things of all was just a skillet flip away: Mom's cornbread.

This particular cornbread is so moist and decadant you could treat it like a cake if you wanted to. In fact, when I first made it for Dani and his roommate, they were amused at the name "cornbread" as what I had clearly just made was a corn cake. Elaborating on this idea, it is easy to create a sweet cornbread (ahem, "cake") by adding a bit of molasses, sugar, lemon and poppyseeds, or apples, ginger, anis, and cinnamon for a rich spice cake. Similarly, the simple flavor of the base recipe can be brought more to the savory side with garlic, onions, peppers, tomatoes, basil, thyme, rosemary, fresh corn, beans, chili powder, curry, or black olives. This is one versatile little loaf, and so easy you may well find yourself with an empty skillet before dinner's finished.

Mom's Skillet-Baked Cornbread
(The original recipe has been adapted to be vegan as well as gluten-free)

Ingredients:

  • 2 cups total flour (at least 1 cup of polenta/coarse corn meal, and the rest in your choice of flour. I like to do 1 1/2 cups polenta and 1/2 cup rice or chickpea flour)
  • 3/4 cup milk (almond is fantastic)
  • 1/3 cup oil
  • pinch of salt
  • 1 tsp raw sugar
  • 2 tsp baking powder
Directions:
  1. Preheat the oven to 375 F (190 C)
  2. Mix all dry ingredients together in a bowl
  3. Mix in the milk a little at a time until you have a very thick, not-quite-pancake-batter consistency.
  4. In a medium cast-iron skillet*, heat the oil over a low flame until just bubbling (not smoking!), tilting the pan to coat the sides and bottom.
  5. When bubbling, pour the oil into the batter and combine quickly.
  6. Pour everything back into the same skillet* and put it in the oven
  7. Immediately reduce the heat to 325 F (160-165 C) and bake for 30 minutes or until a toothpick in the center comes out mostly clean (extra moist is ok!)
Notes:
* If you don't have a cast-iron skillet, as many people don't, you can heat the oil in a sauce pan and pour the finished batter into a gratin form or bread loaf pan. If you use a loaf pan, keep the heat lower and cook a little longer so it has a chance to cook in the middle.

There are SO many variations possible with this recipe! here are a few:

Eggier Cornbread
Before beginning, grind 2-3 tbsp flax seeds and let sit in a glass with 1/4 cup hot water for 5-10 minutes, stirring occasionally. When it is thick and viscous, add it with the milk and continue as before.

Tuscan Cornbread

Puree tomatoes, basil, and garlic and substitute for the milk. Slice up black olives and add to the batter. Garnish the top with salt, pepper, rings of sliced onion and Italian herbs-thyme, basil, marjoram, etc.

Richer, Fluffier, Generally more Fantastic Cornbread
substitute soy yogurt or silken tofu for most or all of the milk. Add a splash more milk if needed to get the right consistency.

Apple-Spice Cornbread
To dry ingredients add 1/2 tsp cinnamon, 1/4 tsp nutmeg, 1/4 tsp anis, and a pinch of cardamom. Grate in 1 apple when adding the milk (reduce the amount of milk to make up for the fruit's moisture, and/or use yogurt instead of the milk), and add 1-2 medium apples, chopped in slices. Increase sugar or add 2 tbsp molasses/agave nectar.

Lemon-Poppyseed Cornbread
Substitute soy yogurt or silken tofu for some or all of the milk. Add the juice of 1 whole lemon, and the grated rind if organic. Add 3 tbsp poppyseeds and agave nectar or other sweetener.

See also:
Morning-After Carrot Bread

Read more...

Fermented Buckwheat Pancake Starter

After reading Wild Fermentation and various blogs about fermentation, and talking a friend who had just discovered some really great fermented pancakes, I have begun experimenting with my own version. The results have been mixed, to be honest, but the starter is at least an excellent beginning. Not just for pancakes, mind you-letting the mixture mature for 24 hours give a thick, gooey batter unlike any gluten-free creation I've ever seen. So far it has been unbelievably helpful in making moister, springier, crumble-less gluten-free loaves of bread! As for pancakes, well, they worked too, but were so gooey that I had a hard time getting a good consistency. So, help me out! Try the starter out and see what works for you...

Ingredients:

Directions:
  1. Place all ingredients in a food processor, blender, or a bowl with a hand mixer, and blend until well combined.
  2. Cover with a cheesecloth and set in a warm place for 12-24 hours.
That's it! Now use this as the base for your favorite pancake recipe, as you would use sourdough starter in making bread-just add a little flour, milk, water, and baking powder if desired, and fry it up. If you want to try crepes, add a bit of flour and a lot of milk to get a thinner batter. These are good savory or sweet, with hummus or jam, curry or syrup. Possibilities abound!

Notes:
Suggested uses:
  • Binder in veggie patties
  • The missing link in gluten free bread
  • In vegan 'loaves', 'meatballs' or other vegan meat alternatives
  • In GF dumpling dough, for added 'glutinous' texture
  • ...

Read more...

Morning-After Carrot Bread

>> Tuesday, January 20


Last night was my roommate Eve's birthday party. It was a fantastic party with a huge feast of food cooked by Eve, her mom, Dani and I. We were all duly exhausted this morning when we met with Baruk, our couchsurfing friend, for breakfast. Not to mention, still not hungry after all the festivities. Which is why we went for a fresh carrot juice instead of the leftover cakes and mousses.

I'm sure most of you who make your own juices share my dismay at the thought of tossing all the solids of your beautiful, fresh produce. Something just has to be done with the leftovers. As usual, mine evolved into some sort of "bread," containing nothing bread-like really, but ending up a wonderful platform for either sweet or savory toppings, and with a dense, moist texture. This particular loaf was a concoction of all the leftovers from my recent experiments: activated pumpkin seeds and pumpkin seed milk, homemade soy yogurt, leftover fermented buckwheat pancake batter, and about 2 cups of carrot pulp. That makes it a fairly picky recipe, but substitutions abound, and the point is not to have to think about it too much when you're wiped out from last night's chaos. So, breathe easy and use what you have.

Morning-After Carrot Bread

Ingredients:

  • 2 cups of carrot pulp
  • 1/2 cup fermented buckwheat pancake starter*
  • 1/2 cup buckwheat flour
  • 1/2 cup polenta
  • 1 cup yogurt
  • milk of any type, until you have a good, thick, cornbread-like consistency
  • 1/3 cup oil
  • 1/4 cup activated pumpkin seeds
  • 2 tsp baking powder
  • dash of cinnamon, cardamom, or other desired spices
  • Flax, Pumpkin, Sunflower, or other seeds for garnish
Directions:
  • Preheat oven to 375 F (190 C)
  • Mix flours, baking powder, and spices
  • in another bowl, combine yogurt and buckwheat starter, then add to the dry ingredients and stir together
  • Stir in carrot pulp and pumpkin seeds
  • Add milk until the batter is a very thick glop. Picture cottage cheese
  • In a large cast-iron skillet, heat the oil until just bubbling (not smoking!).
  • Pour the oil into the batter and quickly mix together, then pour everything back into the cast-iron skillet.
  • Smooth out the top, sprinkle with seeds and put in the oven
  • Immediately reduce the temperature to 350 F (175 C)
  • Bake for 30 minutes or until a toothpick in the middle comes out mostly clean-a little moist is ok!
Notes:
*If you would rather skip the fermented starter, just add a little extra polenta and yogurt, and a binder like xanthan or guar gum if desired-the starter is very gooey and helps to make a springier bread, but is not necessary.

Read more...

Enchanted by Fermentation

>> Saturday, January 17

A few days after Christmas this year I decided it was time to clean out last year's junk. No, not from my apartment; I felt like I needed something to get my body back into a good, balanced state. After moving a few months ago, and traveling for most of the year before, it seems like the very idea of taking the time to develop good habits just hasn't had space to manifest. So, with the help of Oscar, a very nice juicer I borrowed from my friend, I began a 10-day juice fast to clear the slate for the new year.

As I neared the end of my fast, I felt like I had better start preparing some healthy things to consume for afterwards, or surely I would just go back to the cupboard exactly where I left off. I spent a lot of time thinking about how I have eaten in the past and reached the conclusion that although I ate pretty healthily by most standards, the way I ate just didn't cut it. I tended to have quick meals that didn't require a lot of foresight or preparation-or leave much room for enjoyment. One solution dawned on me as I found myself gazing wistfully at jars of sauerkraut and pickles-home fermentation is a perfect way to get more involved with your food.

What ensued was a frenzy of research and experimenting, which has resulted in the erection of a "Fermentation Corner" covered in bowls, jars, and bottles in the living room next to the heater and the posting of a 'Mission Log" for recording the starting dates and notes for projects (because wow did I get lost fast without a record!). It was suddenly obvious that having live, fermented foods around is a healthy and delicious part of a good diet. It also makes for a lot more interaction with your food. Processing each item is like throwing a new thread into the weave of your daily life, and as it become habitual to think about fermentation as a part of your life, the pattern becomes more and more interesting.

The health benefits of fermentation are undeniable: mass marketing alreayd tells us how wonderful yogurt is, and this is because of the presence of healthy bacteria, which help both to break down the hard-to-digest parts of foods in the fermentation process, and aid in digestion in our systems. A great example of how fermentation can enhance foods is seen in soy products. Studies have been done (it's worth noting, these are in western countries) to show that soy products are unhealthy. What others have shown (sources coming soon) is that the 'unhealthy' part of soy is actually due to conventional processing methods. In asian countries, where soy has been a crucial part of diet for centuries, the beans are almost always fermented in some way to help break down the parts that are difficult for us to digest.

Another point I think is worth noting is the history of breadmaking. There are so many theories about gluten allergies and how they have arisen so much in recent years. Many point to white flour as the culprit, and I think there's no way to deny that it is truly difficult for any person to digest white flour, much less get nutrients from it, regardless of a gluten allergy. But whole wheat and other gluten-containing grains also give celiacs and gluten-sensitive eaters some belly-rumbles. Why?

Traditionally, all cultures gathered yeast for bread making from the air around them. this is done through a fermentation process; ground grains and water are left to collect yeast and occasionally stirred to help spread yeast and introduce oxygen. Yeast also accumulates on fruit and other foods. The process involves different types of bacteria entering the flour-water mixture and changing it in small ways which make it more hospitable to new bacteria, which finally make it a comfortable home for yeast. During this process, the grains are essentially pre-digested by the bacteria, including the parts which normally impede digestion by humans...like gluten!

Then the 'starter' is added to more flour to make dough, and the fermentation continues. Depending on the type of bread, it can be for days, and the bacteria continue to digest the grains (meanwhile creating that delicious sour flavor). So even though ancient people ate a lot of wheat, it was in a much more easily-digested form than we usually have today. How long do you think commercial bread ferments before it's baked?...yeah...

Sourdough bread and fermented soy-products are some of the better known fermentations. there are many simpler, equally nourishing and delicious dishes, which basically require no extra work on your part. Soaking grains before cooking (for anywhere from 24 hours to weeks) also allows these good bacteria to enter and start munching. It's like sending your teeth in a day early, and the result is less work for your digestive system. Or how about sauerkraut, or sauer-anything? Amazingly easy!

My point? Well, I'm not really interested in telling you what you shouldn't eat; you can figure that out by listening to your own body's responses. But for a lot of us westerners, fermentation just hasn't been a part of our lives, or not in a major way. I'd like to point out that it's really easy, healthy, and yummy (and so satisfying) to make your own live-culture foods. I never made a fermented product growing up; I never even preserved jam! So maybe I am a little over-excited by the prospect of making my own tempeh and sourdough pancakes from wild yeast, but I sure am enjoying the learning experience.

That being said, there are a lot of knots to work out too. Some things seem to work magically well, like yogurt, soured beets, kvass, and seed milks. But others (pumpkin-seed milk kefir, for example) I just haven't managed to perfect...none-the-less, you can expect a lot of fermentation recipes in the near future as I brine my way along!

You can find some great links for home fermentation in my "Fermentation Links" list; check them out, you will amaze yourself with how easy it is.

Read more...

  © Blogger templates Shiny by Ourblogtemplates.com 2008

Back to TOP