Showing posts with label gluten free gluten-free. Show all posts

One Whiff of Autumn-and the cook is back.

>> Tuesday, October 20

It started a few weeks ago when I went to see Daniel's parents in the village and they brought out the walnuts. Not the appetizer nut bowl, I mean the 20+ crates from the cellar. It wasn't long before they were loading me up with squashes, little pumpkins, and enough garlic to kill the Vampire race. Daniel shook his head helplessly as we tottered to the train station with our harvest loot, and commented, "looks like autumn is really here." I didn't say it, but you know what I was thinking? BRING IT ON.

Because autumn this year is like Christmas-too many delicious things to eat them all and a lot of random gifts from people who are basically just trying to get rid of the junk. Only it lasts for about 2 months and all your presents are really good. And I musta been a good girl this year, because my metaphorical stocking is fit to bust. And as far as my literal stockings are concerned, they'll probably be busting too as soon as I get done eating all this yumminess. Let the games commence.

Now let's get down to business-I already confessed my unjustified long absence and you know (come on, you KNOW) how sorry I am, but still-here's my first shot at redemption:

The 'Make Every Day Thanksgiving' Bowl
serves 4 as a one-bowl meal, or lotsa people as a side

Ingredients:
2 little pumpkins (canteloupe sized-about a 7-inch diameter
1/4 cup olive oil (plus some for basting)
3 cups cooked millet or 2 1/2 cups millet flakes (or cornbread crumbs, that would be radical)
1/2 cup dried cranberries
1/4 cup ground nuts of choice
(opt. add in some chunky pieces of nuts too, mmh.)
4 stalks celery, daintily chopped
1 onion, chopped
6 cloves garlic (woah! but it's good...), chopped
juice of 1 lemon
1-2 tsp soy sauce
1 tbsp apple cider vinegar
1/2 tsp cinnamon (plus a sprinkle)
1/4 tsp nutmeg (plus a sprinkle)
2 tbsp fresh chopped rosemary

1/4 cup+ apple juice
a splash of veggie stock or some boullion (cheaters! ha, that's what i did) and extra apple juice

salt and pepper to taste

Directions:
Preheat the oven to about 350 F, or 170ish C

Cut off the stem and the little flower bump on the ends of your pumpkins, being careful not to go deeper than you need to. cut them in half, er, height-wise? Well, so that the parts you just cut are now the bases of two bowls you have created. scoop out the seeds and save for roasting if you want. Also save a wee bit of pulp and toss it in the stuffing if you fancy.

Rub the pumpkins down with some olive oil and sprinkle with a dash of cinnamon, nutmeg, and salt. Bake for about 30 minutes, or until almost totally tender when poked.

Meanwhile, heat a tbsp of your oil in a pan over medium and sautee the onions until glassy. Add the celery and cook for about 2 minutes. Then add the millet, and-actually, just toss it all in there. Everything. Keep going til you feel you shouldn't any more. I cooked mine about 10 minutes total just because I kept adjusting the taste.

You wind up with a nicely mingled mush, but not tooooo runny, just comfortably un-solid.

fill your pumpkins and bake for another 15 minutes, or until the stuffing looks lovely and crusty on top and the pumpkins seem good and tender.

voila!

Read more...

Many-a-Dark-Green Later: Sugar-Free Week One

>> Wednesday, April 8

In case you missed my last posts, I am eating along the guidelines of the Anti-Candida Diet this month in an attempt to balance the yeasts in my body. I am also participating in the Chase Daylight Vegan Challenge with this cleanse, and you should really check out Ryan's awesome blogging on her adventures in the world of veganism. Now, onto the sugar-free frontier...

Funny how when we make dietary commitments, they seem remarkably simple. No refined sugar? Heck, I've done that before. I love the natural flavors of foods, and I don't usually need anything to sweeten my already delicious fruits and veggies. I can easily skip the brown sugar on my breakfast porridge. I felt anything but insecure last Wednesday as I decided once and for all to go anti candida this month.

Blow number one: I didn't just lose the obvious crystallized and syrup sugars. I also cut out all fruits, except for avocado, tomato, and fresh lemon. That hurt a little. No apples or bananas in my breakfast porridge now. Looking stark. I got a definite sad face, but I kept my chin up.

Then came blow number two: low-carb diet. Gotta cut out as many carbs as possible so the yeasty little beasts can't feed on them. So not only are the apples and bananas gone from my breakfast bowl, the porridge is called into question too. While whole grains are allowed, they aren't really the focal point any more. That is a bit strange for most eaters, myself included. Add in the loss and/or reduction of starchy vegetables, like potatoes, carrots, and beets, and you've got one confused cook.

I wracked my brain and those behind many, many anti-candida websites in my quest for simple recipes this week that were vegan, gluten-free, and anti-candida. That's not a lot of wiggle room, my friends. But, a few bland dishes of plain greens later, I emerged with my first good anti-candida recipes, which are here for you to enjoy.

First, because I did Shankhaprakshalana to start my cleanse, an ayurvedic intestinal cleanse from Asana Pranayama Mudra Bandha, I knew I had to start out my eating with lentils and rice. specifically, it's supposed to be a very simple kicheri with ghee and turmeric. I opted for plain red lentils, brown rice, and turmeric with flax oil on top. Delicious.

By day 2 I introduced some veggies to the meal, but kept the thick soupy consistency for ease of digestion. Unlike the juice fast I did for new years, this one recommends cooked veggies to start, again for ease of digestion. To each her own, so whatever feels right is probably it. For me, cooked, soft, and gentle sounded good a mere 48 hours after flushing everything out of my digestive tract.

The meal here is kicheri with the addition of a little carrot, turnip, garlic, onion, parsley, and kale. The flavor is unbelievably good, and the texture is so comforting and easy on the belly. I have no qualms about eating this meal regularly for the rest of my life, candida or no! I didnt use traditional Indian methods for cooking because I didn't want to fry the oil or spices in the beginning. This is more like a one-pot homey stew than your average restaurant kicheri, but it's really, REALLY fantastic, healthy, and easy.

If you're not on the ACD (anti candida diet) feel free to add more carrots and other starchy veggies, or not!


The dish here is shown with less kale than the recipe calls for.
Expect much more delicious greenery, this bowl wasn't quite up to snuff!)


Humble Kale Kicheri (for 3)

1 1/2 cups red lentils
1 cup brown rice
2 tsp flax oil
4 cloves garlic, chopped
1 carrot, chopped
1 turnip, chopped
tons of kale, chopped
a bunch of parsely, chopped
1 yellow onion, chopped
1/2 tsp turmeric

Rinse the lentils and rice and put in a pan with 3 cups water, the onions, carrot, turnip and the turmeric

Bring to a boil, cover, reduce heat, and cook for about 30 minutes. Stir occasionally and check that all the water doesn't evaporate. Add more as needed to keep the consistency a little on the stew side.

When the rice is done, add the kale, parsley, and garlic, stir them into the kicheri, and cover again. Cook for 5 minutes and turn off the heat. Serve with flax oil drizzled on top, and roasted pumpkin or sunflower seeds if desired. mmm....


When I felt like I couldn't eat another bite of kicheri (took about 4 days), I entered the realm of other legumes. I made a very hearty bean soup with I used as a base to add steamed veggies to for a few meals in a row. It was extremely satisfying yummy, especially given the simple ingredients list:

Four Bean Country Stew (makes 4-6 servings)

3/4 cup dried kidney beans
3/4 cup dried black beans
1/2 cups dried chickpeas
1/2 cup red lentils
1 piece kombu seaweed

1 cup large onion chunks
6 cloves of garlic
2 sprigs fresh rosemary
1/2 tsp turmeric
1/2 tsp fresh ground black pepper
a dash of salt

2 carrots, chunked
1 turnip, chunked
a whole lot of dark green: spinach, kale, chard, etc.
1/2 cup chopped fresh parsley

Soak the kidney beans, black beans, and chickpeas overnight. Drain, rinse, and set in a pot with the kombu seaweed and about 6 cups water (adjust as needed to keep from drying out). Cook for 1 1/2 hours, or until the beans are tender.

Add the lentils, carrots, turnip, onion, salt, pepper, turmeric, and rosemary. If needed, add a little more water. Cook, covered, until the veggies are soft, about 30 minutes, and add in the greens, parsley, and garlic. Cover again and cook for 3-5 more minutes, until the greens are wilted and the garlic is just cooked. Serve with roasted pumpkin seeds and/or steamed broccoli.

Finally, I couldn't look another bean in the eye, and I turned to salads for lighter fare. It's hard to make a salad that's truly satisfying when you're used to a bowl-full of hot carbs and protein. I came up with a few types that really hit the spot though. I didn't manage many pictures, but here are two with photos at least.


A super simple mix of nüssli-salat (corn salad) and spinach topped with avocado, celery, roasted sunflower, pumpkin, and sesame seeds, and a drizzle of flax oil.


A bombilicious spinach and unidentified dark purple green (use any lettuce you want) with carrot, celery, roasted flax, sunflower and pumpkin seeds, and this incredible, AMAZING Lemon-Zatar Yogurt Dressing.

OMG it's so good. I served my salad with a little more dressing spread over a rice cake and sprinkled with more zatar, because I couldn't resist.

Lemon-Zatar Yogurt Dressing
1 cup plain soy or other yogurt
2 tbsp flax oil
2 tbsp zatar
juice of almost a whole lemon (about 3/4)
1 clove garlic

Grate the garlic clove and mix it all up. For a thinner dressing, add a bit of water. That's it! Try not to eat it ALL off the spoon directly, it's worth the wait to put it on a salad....

Last, but certainly not least, was a Creamed Avocado-Arugula mix. Very simple and good. I served it with fresh spinach alongside Kale Kicheri for a dark-green foodgasm yesterday afternoon.

Creamed Avocado-Arugula Salad (serves 4)
1/2 ripe avocado
juice of 1/2 lemon
a twist of fresh ground black pepper
a dash of salt

water as needed

150 g fresh arugula, washed
50 g spinach, washed

Mash the avocado with the other dressing ingredients until creamy. add water and whip until the mixture is fluffy and barely pourable. Toss the salad arugula and spinach with the avocado blend and top with roasted seeds, cherry tomatoes, chopped celery stalk, or anything else you like.

Read more...

Tonsa Pho-n: Vegan Miso Pho

>> Wednesday, April 1

A sea of veggies

With a surprise below

It's a terrible pun, but it's still funny if you know that 'pho', the name of the classic Korean noodle soup, is actually said "fuh". It is. It's also known for its masses of meaty ingredients-from meat stock to chunks of beef, chicken, shrimp, octopus, squid, mussels, egg, pork, and crab. In California restaurants, there is always a vegetarian option too, but I have no idea how they manage to replicate the amazing broth flavor of traditional pho. I looked up some recipes the other day, and it seems complicated. I'm intimidated by complicated asian recipes becaus eI don't know which boundaries to respect. But I happen to know another soup-loving asian country with very easy recipes: Japan. Erin's gone all trigger-happy with the miso again.

This soup is absolutely the most satisfying, umame-loaded bowl of deeeelish I've made. I just ate it for lunch 3 days in a row. It's not exactly like pho yet, I have to perfect the faux-pho taste (somone stop me), but it's so good you won't care. And you know what, if you are a bento fan, this is a great bento meal. You can easily take along a bowl already made with a side container of chopped mint leaves, onions, chives, chilis, sprouts, or any of the other magnificent pho toppings out there. For those of you with access to a kichen at work, just take the ingredients and enjoy the zen-like process of finely slicing your leeks and ginger root next to all the fools with Campbell's soup cups. You won't notice the funny looks, because the tendency when eating perfect food is to, er, pho-get the world around you...

Vegan Miso Pho (for 1 medium-large lunch. I couldn't finish it all!)
I brought the ingredients to work and made mine there: I premixed the spices, brought the portions of whole veggies, garlic, and onion, and stuck the rice noodles in a tupperware with the tiny sack of seaweed and a plastic-wrapped miso ball (i used the corner of an old ripped produce bag). Learn more about miso balls at Just Bento, Maki's wonderful bento blog.

Ingredients
A single serving of rice noodles, whatever you deem appropriate
2 tbsp Arame seaweed
2 dried mushrooms of choice (shitake would be great, I had some Swiss thing)
1 small carrot, sliced into thin rounds
1/2 leek, sliced into thin rounds
6 little chunks of tofu (opt)

1/2 red onion, diced
3 cloves garlic, minced
1/2-inch chunk of ginger root, minced
1 dried red chili, chopped, ground, or use a pinch of hot cayenne, paprika, or chili powder
2 tsp dark miso paste
1 tbsp toasted sesame (or other, less delicious) oil

a twist of black pepper
1 tsp turmeric powder
1/2 tsp fennel seeds
4-5 cumin seeds
1/2 tsp anis seeds, if you have them (i didn't)
a dash of nutmeg
salt if desired

garnishes: chopped mint leaves, cilantro, onions, chives, chilis, or mung bean sprouts.

Directions
Put the seaweed and mushrooms in 2 cups cold water to soak

Boil 2 cups water, pour it over the rice noodles, and let them sit for a few minutes, or until soft (or follow the directions for your noodles). Drain and set into the bottom of you soup bowl.

In a saucepan, heat the oil and add the spices. Cook over medium-low heat, stirring, until nothing pops anymore (a minute or two).
Add the ginger, chili, and onion. Stir and keep cooking until the onions are glossy.
Add the leek and tofu, and if necessary, a dash of water. Keep stirring and scraping off any spices that stick to the bottom, until the leeks are tender.

Pour the water with the seaweed and mushrooms into the pan, stir thoroughly, and cover for 1-2 minutes. Keep the heat low enough that it wants to simmer but can't quite. Add the carrots and garlic, and cook for another few minutes, until the carrots are barely cooked, but nowhere near soft. Remove from the heat and stir in the miso by first dissolving it in a spoonful of hot broth. Serve!

Read more...

Savory Granola Success: Dankness and Beyond

>> Tuesday, February 24


Dank. It doesn’t mean dark and wet here. In Northern California lingo, it’s the epitome of GOOD. No, I don’t think you heard that right; Goo-OO-ooOOd. The stuttering, multi-syllabic one. There you go. That one.

As I wrote yesterday, I accidentally ate some gluten over the weekend and I have been functioning in a stupor of all the usuals ever since: indigestion, bloating, headache, and cravings. This granola is my answer to feeling nutrient- and fiber-deprived: pumpkin seeds and molasses for iron and calcium, plus more from the tahini; fiber from flax, oats, and “chufas nüssli,” and healthy fats from the flax oil and other seeds and nuts. Nutritional yeast for trace elements that GF-eaters can always use, and a dose of good intentions for healing up my digestive tract. And the olives are healthy, but I did it for the flavuh, because let me tell you...Mm. Mm-hm.

I put everything I had into this granola recipe, and I am pleased to say that somehow, it came out delicious. Of course, you can add the ingredients closest to your heart instead of the ones I chose-I just had a hankering for the taste of seedy-nutty-sesame-braggs-yeasty-goodness, a combination that tastes so much like home I might have woken my mom up from around the world just by listing them in that order. Dank. It’s really all I can say.

Spiced Savory Granola, GF and Vegan, of course!

Ingredients (don’t be intimidated, mix and match as needed, and see notes for help!):
½ cup activated sunflower seeds
1/3 cup activated pumpkin seeds
1/3 cup sesame seeds
½ cup flax seeds
¼ cup activated hazelnuts
½ cup GF oats
½ cup nutritional yeast
½ cup chestnut flakes
½ cup ground "earth almonds"*
1 tbsp rosemary
1 tsp ground cardamom
¼ tsp nutmeg
½ tsp garlic powder
½ tsp cumin
1 tsp fennel seeds
½ tsp black pepper

1 small banana
1 tbsp braggs amino acids or tamari
1 tbsp tahini
1 tbsp molasses
10 kalamata olives
1 tbsp flax oil

You think I’m crazy, don’t you? Bananas and olives? yeast and molasses? What are Earth Almonds anyway??? Just come to the dark side of baking, that shadowy experiment lab, for an afternoon and try to tell me after it wasn’t worth it.

Directions:

  1. Grind the flax and fennel seeds into a coarse meal.
  2. In a mortar and pestle, or food processor, mix to a paste ½ the sunflower seeds, a few spoons of water, the hazelnuts, flax-fennel meal, and all the wet ingredients.
  3. As your seeds/nuts will probably still be wet from soaking, toss them in the wet ingredients and stir together.
  4. In a large bowl, mix the dry ingredients with a fork until combined.
  5. Pour the wet ingredients over the dry and mix together. It should all be moistened and vaguely sticky. If you have dry spots left, add a splash of water and/or oil and mix again.
  6. Preheat the oven to 350 F (175 C). Oil a large baking sheet and spread the mixture out on the sheet, loosely breaking into clumps with a spoon or fork.
  7. Bake for 30 minutes, or until browned and mostly dry, stirring every 15 minutes to prevent burning.
  8. Let cool and enjoy!

Notes:
*sedge tubers. If the word 'tuber' confuses you, see here. Often the spanish word chufas is used on packaging. You can substitute nut meal of any kind or another mealy ingredient, or up the oats and omit them entirely.

A few tips to keep in mind for substitutions:
Savory granola is lacking the usual gooey component of honey, agave, or (blech) corn syrup that most sweet granola’s use. That’s why I used a banana, the tahini, the ground sunflower seeds, and the molasses, all of which moisten and bind. The banana doesn’t give any flavor to the finished granola, but you could substitute something else if you just don’t like the sound of it-applesauce or nut butters work well, but with nut butters, you will need to add something liquid to even out the thickness. Using flax meal also adds to stickiness, and is just fantastically healthy and good.
The point is, granola is simple, and you don’t have to follow any recipe to the t. Just add the things you like and see what happens, I truly don’t think you can go wrong.

(Ready for shelving in a recycled raw sugar bag :))

Read more...

Guiltless Quiche Provencal

>> Wednesday, February 18


As a teasing, warm morning unfolded Saturday, I caught a whiff of fresh oregano in Marktplatz, where the morning market is always held in Basel. I sourced it to a booth with marinated green olives, some stuffed with garlic, others almonds, and all begging to be sampled. The tangy, herbed meat of a large, plump olive reminded me just how long it had been since I had enjoyed one. Winter has apparently converted all my taste buds to conservative root vegetable fundamentalists. Like most people in northern climates who try to eat local in the winter, I’ve mostly eaten potatoes, carrots, and beets for the past few months. Enough is enough. We like our root veggies, but there’s a need at some point to help spring get back up here. But what to do to try to bring some life to a decidedly northern meal plan?

When in doubt, just think Mediterranean. It’s a region that never ceases to dazzle and satisfy our tastes. So many articles have been published on the health benefits of Mediterranean cuisine, and the area’s food culture is rich in delicious, varied local ingredients, artistic creativity, and an appreciation for true enjoyment; the kind that comes from long summer days drinking coffee in the shade of olive trees, absorbing lazily that warm southern repose. Italy, France, Greece…Sure, there’re the ancient civilizations, the scientific breakthroughs, philosophical landmarks, and artistic geniuses; and then there is the tender, delicate pesto, the elegant tapas, and, the mother of all soul-satisfying goodness, the quiche.

Then you discovered a gluten allergy, and turned vegan. And one chirping spring morning found you gazing teary-eyed at the warm glow of the deli case before turning back to the salad bar, sure you would never enjoy another bite of your favorite café courtyard meal.

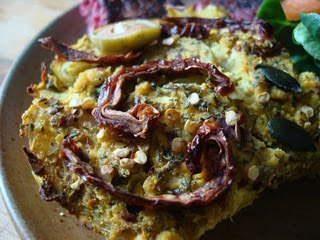
A few hours after the olive-sampling in the market I am contentedly kicked back with a tea and a warm belly full of the most flavorful, perfectly-textured quiche I’ve ever had. And you know what? Not one animal ingredient or glutinous grain. Just the summer-fresh taste of sundried tomatoes, fresh basil, oregano, and rosemary, and the springy, dense moisture of this crustless quiche’s golden flesh. It’s enough to transport any gluten-free, vegan, landlocked northern cook to vibrant French Provence. Forget about breaking a sweat in every bakery- The divinity that is fresh quiche is all yours.

Guiltless Quiche Provencal
(Thanks to The Happy Herbivore for the inspiration to use turmeric-colored tofu and other great ideas!)

Ingredients:

  • 400 g firm tofu, drained
  • ½-1 tsp turmeric (for color)
  • ½ tsp black pepper
  • ½ tsp salt
  • 1 tsp Braggs (opt.)
  • ¼ cup nutritional yeast
  • 1 tsp oregano
  • 1 heaping tbsp fresh chopped rosemary
  • 2 tbsp fresh chopped basil
  • juice of 1 lemon
  • 4-5 cloves garlic
  • 100 g green olives, sliced (reserve 5 slices for garnish)
  • 10 sundried tomatoes (reserve 4 for garnish)
  • ½ head celeriac, grated
  • ½ kohlrabi, grated
  • ½ leek, chopped
  • 1 bunch/head of chard, chopped
  • 2 tbsp pumpkin seeds (garnish)
Directions:
  1. Preheat oven to 350 F (175 C). Set aside 5 slices of olive, 4 tomatoes, and the pumpkin seeds for garnish.
  2. In a large frying pan steam 6 tomatoes, chopped, in a little bit of water until softened and warm. Add the vegetables, cover, and steam until the chard is wilted. Set aside.
  3. Combine all the other ingredients and puree in a food processor or mix by hand until you have a smooth, thick batter. Add a tiny bit of water if needed to blend everything fairly smooth.
  4. Combine everything and scrape into an oiled casserole dish.
  5. Garnish and bake for 20-30 minutes, until the center is firm and the sides are lightly browned and coming away from the sides.
  6. Let cool until sliceable and serve.

Notes:
As a party dish, this can easily become dip for bread, chips, or crackers. Follow directions for steps 1-4, then garnish and bake just until warmed through.

Read more...

Roasted Beet Risotto with Sage and Chickpeas

>> Wednesday, February 11


(Risotto served here with sauteed chard, leek,
and lentil sprouts, and vegan mint raita)

The only beef I have with rice dishes lately is that I crave something, simply, juicier. I love a bowl of brown rice, and with some tamari and nutritional yeast to moisten the grains, it’s certainly enjoyable. I might describe it as satisfying, healthy, nutty, and earthy. Great. But it’s a far cry from mouthwatering, or fingerlickingly creamy, which is what I really want this week. I’m searching for something more like the vegan, gluten-free equivalent to the texture of fresh-grated parmesan melting over basil lasagne.

Enter risotto, the transvestite, showgirl sister of the simple boiled rice bowl. How often have I heard brown rice dishes defined by non-vegans as “why they would never go vegan”? Enough to know that they are not thinking outside of the box. A brown rice risotto is a truly luxurious meal, and one that everyone can enjoy, vegan, omnivore, and devout carnivore. This one is so tenderly soft, melty, and moist I think even my Swiss roommate would forget to ask if it had cheese, and of course, we know the answer.

The creaminess I was hunting came from an unexpectedly perfect source. To start, I knew I didn’t have wine to use in my risotto, and I found myself dreading the lack of such a crisp, dry flavor. I peeked around the fridge and tried to think of something with that special “bite” a steaming white wine gives. Vinegars just weren’t going to cut it, likewise homemade pickle-brine. And then-Aha! The aged soy kefir whey on the windowsill caught my eye.

When you let a kefir whey age outside of the fridge, the beverage takes on a wine-cooler kind of quality, with an alcoholic edge to its original sour flavor. The clear, zingy drink has something strongly reminiscent of white wine, and even provides a bit of a cheesy taste too. From using water kefir for wine, it was just a short jump to using soymilk kefir for cheese, and voila, a creamy, edgy risotto lacking none of the richness a dairy version promises.

The beetroot gives a beautiful color and lovely sweet flavor to the dish, and celeriac and carrots finish off a wonderful trio of seasonal root veggies. Sage, fresh-picked from the front yard, not only looks great with the purple beet, but adds a slightly smoky undertone to the mix. Finally, chickpeas partner up with rice as our vegan serving of complete protein (grass plus legume) and lend a soft nutty texture in the process. Altogether, a multicultural, healthy take on risotto that practically sighs for you as it touches your taste buds.


Roasted Beet Risotto with Sage and Chickpeas

Ingredients:
  • 2 cups short or medium grain brown rice
  • About 5 cups of veggie stock or water*
  • ½ onion, chopped
  • 3 medium carrots, chopped into half-rounds
  • ½ celeriac, cubed
  • 1 very large or 2 medium beets
  • 1 1/2 cups cooked chickpeas
  • 3 tbsp fresh sage, chopped
  • 3 tbsp fresh rosemary, chopped
  • 5 cloves garlic, finely chopped or pressed
  • ¼ cup olive oil
  • ¼ cup soymilk kefir**
  • ½ cup kefir whey (or dry white wine)
  • ½ tsp ground black pepper
  • salt to taste

Directions:
  1. Wash the beets and remove the greens***, being sure not to chop into the beets (leave a little stem). brush them with olive oil, wrap in aluminum foil and bake at 350 F (175 C) for 30 minutes, or until tender when poked with a fork. Let cool. Grate ¾ of the beets, coarsely chop the rest.
  2. In a large pot, heat the oil and add the onions, stirring. Add the pepper and a dash of salt, and cook until the onions are transparent.
  3. Add the rice, stirring, and cook for a few minutes, until the rice is very lightly browned and shiny.
  4. Add the kefir whey or wine and stir for another minute or two, then add the grated beets and ½ cup stock or water, continuing to stir until all liquid is evaporated. Repeat this until the rice is about half done.
  5. Add the herbs, carrots, celeriac, and 1 cup of liquid. Cover until the veggies are almost done (check that there is still liquid, stir and add more if necessary, then cover again).
  6. Stir in the chickpeas, chopped beets, and milk kefir. Taste and add salt if needed, and more kefir if desired.

Notes:
*I used water and a splash of homemade kimchee brine. **You could probably use soy yogurt too. If you’re not a vegan, obviously some parmesan will do! *** SAVE YOUR GREENS!!! Chop them up and toss them in if you like, or sauté them for a gorgeous side dish to the risotto.

(I'm considering a new name:
"Disappearing Act Risotto." The bowl
never seems to stay full...)

Read more...

Five Minute Balsamic Tipped Veggies

>> Tuesday, February 10


I thought it would be impossible to make something this delicious and healthy in less than 10 minutes, but sure enough, it took just 5, even with an electric stove to slow the process. The nice thing about cooking with Swiss regional foods is that it’s incredibly easy to make authentic Italian flavors too, and the oregano, balsamic vinegar, and fennel all lend themselves perfectly to this Swiss-Italian fusion.

Five Minute Balsamic Tipped Veggies

Ingredients (for 1. Multiply by the number of people to be served for a side, or multiply by 2 for each person for a main dish):

  • ¼ large head of fennel, sliced into strips.
  • 1 yellow (or other) carrot, sliced into rounds
  • ½ tsp dried oregano
  • 1-2 tbsp balsamic vinegar
  • 1 clove garlic, chopped
  • a few tbsp water
  • a pinch of black pepper
  • 2 round slices of lemon

Directions:
  1. Heat a skillet over medium flame for just a moment before tossing in the carrots, fennel, vinegar, and some water. Stir to coat and cover quickly.
  2. When the liquid has evaporated, continue stirring with a bit more water, and add the pepper, oregano, and garlic.
  3. Add the lemon and increase the heat for 1 minute, stirring, to give a browned, roasted edge to the veggies.
Finito!

Read more...

Tender Tummy Breakfast for One: Amaranth Apple Porridge

>> Sunday, February 8


Last night was Satsang at the yoga studio. Niki and I both brought little food offerings for the shrine, and both were fantastic. How can you go wrong with dried bananas and date-nut balls? Well, I guess moderation is the key…One date-nut ball is probably enough! Still, it’s just so nice to sit around with everyone after and pass the offerings, trying each one…and in my case, trying each one again ☺ Today, I felt a little heavy from the dried fruit and nut bomb, so I whipped up a simple, satisfying breakfast to sooth my digestive discontent.

This is one of the best hot breakfasts I’ve had lately, so flavorful and calming, and very healthy with no added sugar or heavy fats.

Ginger and Apple Amaranth Porridge

Ingredients:

  • 1/3 cup dry amaranth
  • 2/3 cup water
  • ¼ cup chopped apple (plus 2 slices for garnish)
  • 2 tbsp silken tofu
  • ½ tsp grated ginger
  • ¼ tsp vanilla extract
  • ¼ tsp cinnamon
  • ¼ cup rice milk

Directions:

Cook the amaranth in the water, covered, until almost completely done (10-15 minutes). If there is no water left, add a little more.

Add the chopped apples and ginger and cook until the amaranth forms its characteristic gooeyness, about 5 minutes. 

Lightly crumble in the tofu and stir over a medium flame for a few minutes until the mixture is almost thick enough to stick to the spoon when you hold it up.

Serve with the rice milk, cinnamon, and apple slices on top

Notes:
Enjoy with a cup of spearmint tea for extra stomach relaxation.

Read more...

Recycled Gluten-Free Bread

>> Saturday, February 7


If when you think “bread” you think flour, yeast and water, it’s time to spice it up a little. Almost anything can be made into something “breadlike” with a lot more nutritional value, flavor, and variety of texture. The recipe here is one version of a recycled food bread, which I tried to make as general as possible so you can fill in the blanks with you own ingredients. Nothing about it is set in stone; I never measure for this one, and it’s different every time I make it. That’s just the nature of recycling food-always interesting and unique!

In general, this usually creates a dense, small, moist loaf. It has no added yeast and rising is not really the goal, just fermentation of the ingredients for easier digestion. Sometimes I add some baking powder before baking to help it fluff up a little. If I have mostly veggie ingredients, I tend to let the loaf stay completely unleavened and bake on the lowest temperature setting for up to 8 hours. The result is something like vegan meat, which, because it contains live bacteria, keeps for literally months in the fridge. That particular version is great marinated in a little miso and garlic, then sautéed with fresh veggies, or crumbled over spaghetti as ground beef. Yum!

Recycled Gluten-Free Bread

Ingredients:
Sourdough starter:
1-2 cups GF flour,
2 tsp guar gum (opt)
1-2 cups water, water or milk kefir, or yogurt

Grain ingredient can be 2-3 cups of one of the following:
Leftover cooked grains, like rice, quinoa, polenta, etc
Leftover bread mush from making kvass
Stale bread, chopped, roasted to dry, and soaked in the liquid ingredients
Leftover pasta
Sprouts
Up to 1 cup of flour, if desired, for binding

Veggie/Fruit Ingredient can be 1-2 cups of one of the following:
Pulp from juicer
Old grated salads, especially if too dry to enjoy
Leftover mashed potatoes, or other creamed/cooked veggies

Liquid Ingredient can be 1-2 cups of one of the following: Soy yogurt
Soy milk kefir
Water kefir
Tahini and water
Kimchee brine or other pickling brines combined with water (if you use a salted brine, add it at the end to let the yeast do it’s work first, and moisten initially with clean water)

Other Ingredients include the desired amounts of any of these things:
Extra flour
Herbs, spices, sautéed onions, garlic, or other flavorings
Activated seeds, nuts, or nut meal (flax meal soaked in warm water as an egg replacer works wonders)
Water
Baking powder
Yeast

Directions:

  1. Mix sourdough starter ingredients in a clean bowl or jar, adding more or less water to get a sticky, moist, stirrable batter. Leave in a warm place for 1-3 days, until fluffy and bubbly.
  2. When the sourdough is ready, mix up the grain ingredient, veggie/fruit ingredient, and liquid ingredient (leaving out brine for now), adding more or less of the liquid ot get a spongy, very moist dough. Stir in the sourdough starter and leave in a bowl covered with a moist towel for 8-24 hours in a warm place
  3. If it hasn’t risen at all, the sourdough didn’t like something very much in your mixture, could be too much salt in the grains. It’s not important though, other bacteria are there working for your bread!
  4. If desired, sprinkle baking powder over the dough and fold in, or dissolve yeast in warm water and mix in, to have a leavened loaf.
  5. Fold in any seeds, nuts, herbs, spices, etc. that you would like and add the brine if using. Cover with any toppings for decoration that you wish
  6. Bake in a bread-loaf form for 2-8 hours; quicker for more grainy, leavened breads, and longer for mostly veggie or sprout breads, to get a dense “vegan meat”


Read more...

Butternut and Fennel-seed Miso

>> Thursday, February 5


To think that just one month ago I had never even used miso in a recipe is almost beyond me. It has been in everything I make lately, and it seems to provide that magical “oomph” I sometimes crave but can’t quite place (umami...). A friend of mine offered to cook lunch for me a few days before she moved to Germany last week, and she brought me to a realm of miso-induced-ecstasy I never dreamed could exist. Fresh leeks sautéed in sesame oil with turmeric and fennel-seeds, plus flavorful red onions and fresh ginger made one bowl of it enough to tempt me into packing my bags and swimming to Japan, which is where she learned to make it. Along with her suggestion of adding pumpkin or squash and the inspiration of watching her cook this soup to perfection, I have created my own version:

Sauteed Fennel and Butternut Miso

Ingredients:

  • 1 piece dried kombu seawead (optional)*
  • 2 sheets nori (optional)
  • 2 tiny or 1 small-medium red onion
  • 2 tsp finely chopped ginger
  • 1 fresh leek, finely sliced in rings
  • 1 hea dof fresh fennel, thinly sliced
  • 1 cup diced pumpkin
  • 1 cup diced tofu, firm
  • 2 tbsp turmeric powder
  • 2 tbsp fennel seeds, whole
  • 4 tbsp sesame oil
  • 3 tbsp miso (Christina used Mogi, but it’s not GF, so use any that is)
  • 3 cloves garlic, minced
  • gomashio to taste (a few tsp) (optional)

Directions:
  1. Soak kombu for 5 minutes in about 6 cups of water, then cover and cook for about 20 minutes. Set aside.
  2. Meanwhile, heat 1 tbsp oil in a frying pan and add the tofu, stirring to coat all sides. Add some gomashio and a splash of the kombu stock, cover, and cook until the stock is gone and the tofu is lightly browned.
  3. In your soup pan, heat the rest of the oil and add the turmeric, fennel seeds, onions, garlic, and ginger, stirring as you go. Cook for a few minutes over medium-low heat, then add the fennel, leek, and pumpkin with a splash of kombu stock just to moisten them. Lightly sautee the veggies for a moment, then add the rest of the stock and cook until the leek is lightly tender.
  4. Remove from the heat and let cool a few minutes before adding the miso, to make sure you don’t kill it.
  5. Dip out a ladle-full of soup and dissolve a spoon of miso into the ladle of soup, then empty the contents back into the pot. Repeat for all the miso, taste, and adjust anything you need to. Serve with the tofu on top and gomashio and crushed nori as garnish.

Notes:
*If you don’t have kombu, just use water

Read more...

My Snow-Day Comfort Food: White Bean Stew with Butternut Filets

Just…I don’t need to explain. Butternut has a reason for its name, and with a light steaming it melts over this country-style stew like dairy-fresh cream. Heavenly. The soup itself is essentially the stewed version of White Bean Bucket Salad, because I can't get enough of the flavor, all the ingredients are local and seasonal (except gomashio, kombu, and tahini!) and because it's such a satisfying, nutritious meal. I owe much inspiration for this one to my mom, for her insistence on white beans as super-foods, and Farmgirl Susan for her Roasted Garlic Lover’s White Bean Soup. Enjoy a bowl while nestled with a frost-laced view of winter and a slice of recycled bread, my gluten-free specialty.

White Bean Stew with Butternut Filets

Ingredients:

  • 2 cups cooked white beans (if cooked with kombu seaweed, save the water)
  • 4-6 cups kombu stock (or water/veggie stock)
  • 4-5 carrots
  • 1-2 potatoes
  • 2 turnips
  • ½ head of celeriac
  • 10 slices of butternut squash
  • 1 onion
  • 1 head of garlic
  • 1 big sprig of fresh rosemary, chopped
  • 2 tbsp tahini
  • 2 tsp thyme
  • 2 tsp oregano
  • salt and pepper to taste, and/or gomashio garnish (mmmmm)
  • ¼ medium white cabbage
  • 2 tbsp oil
  • a splash of rice wine or apple cider vinegar (opt.)
  • ½ cup sprouted chickpeas (opt; garnish)

Directions:
  1. In a soup pot, bring your stock to a boil and add carrots, potatoes, celeriac, onionsand turnips, all coarsely chopped. Cook until potatoes are almost finished.
  2. Meanwhile, separate the garlic cloves and put, unpeeled, in a little oven-safe dish, sprinkled with water and covered with tinfoil. Bake for 30 minutes at around 350 F.
  3. Add the cabbage, finely chopped, the beans, and herbs to the soup and simmer until the cabbage is soft.
  4. Peel the garlic and put it in a medium sized bowl (or food processor, blender, etc) with 1/3 of the soup and the tahini. Blend until fairly well-combined, and add back to the rest of the soup with a splash of vinegar if using. Blend more if desired, or add more stock as needed. But really, thick is gooood!
  5. Heat oil in a frying pan and add the chickpeas and squash slices. Turn a few times to coat with oil, then add a splash of water, quickly cover, and steam until both are just tender.
  6. Add a pinch of gomashio (or salt), turn quickly, and remove from the heat.
  7. Serve the soup with the squash and chickpea mixture on top, and fresh oregano or thyme if available.

Read more...

Owed to a Bento: Kid-Friendly Lentil Snacks

>> Wednesday, February 4


“What’re THOSE?” Alessandro asked today, peering over my shoulder as I scanned eagerly through recipes on JustBento.com. He is probably the best friend I've ever had in a 5-year old, but none-the-less, a typically picky eater. We had just settled on a rice-cake with pesto for his snack, and his sauce-smeared finger swooped dangerously close to the screen as he motioned at a picture of Spicy Lentil snacks with Sesame Seeds. For once, his voice held no hint of skepticism, and I silently thanked his reading level, for being just right so that he couldn’t see that the main ingredient was lentils, something he’d never touch in native form.

I have been intrigued by bentos ever since finding them online yesterday, and I have been wanting to make some of these delicious-looking little lunch-box fillers. “Do you…” (could my luck be that good?) “do you want to try making them with me?” I ventured. He beamed an ecstatic “Yeah!” and we darted into the kitchen, digging out ingredients to see what we could come up with.

We had only about ¼ cup of dry red lentils left, so we needed to supplement, which is why the result is something much different than the original. That, and the fact that we were recreating Japanese-inspired vegan cuisine in an omnivorous Italian kitchen. First off, spicy had to go for the little guy to enjoy them, and I was on a mission to get some veggies into him, so they needed to be artfully disguised to avoid disgust. Pulling my tupperware of sliced purple cabbage out, I handed a piece to Alessandro for review. “Do you like this stuff?” He gingerly nibbled the corner and in a moment of total silence I was sure he would spit it out. Instead his eyes widened and he bounced noticeably as he said, “Wow, the purple thing is yummy!’


Bingo! It was so exciting to prepare something healthy for Alessandro that didn’t involve bread, cheese, or meat, his three favorite ingredients. He was relegated to carrot-peeling (under wary over-the-shoulder supervision…”don’t give 5-year-olds blades!” My mom’s voice seemed to echo…) and I cooked the rice. Then he retired for some Lego-building while I whipped up the other ingredients. We formed the balls together, discussing seriously techniques for making perfect ball-shapes and using good sesame-rolling technique.

“It’s all sticky. Is this enough?” he asked, the mixture smeared across his palms and one piddly lump in the middle that he focused intently on. “Well, maybe we could add a little more and then go like this (patting hands together) to make a ball.” Alessandro carefully placed one more pea on top of his mushy lump and smiled. “There, is that enough?” Sure, why not! Sure enough, we had a fantastic array of sizes and shapes when we finished. Though we ate from plates, the bento-spirit was certainly there: we each had just enough food, a healthy array of proteins, carbs, vegetables, and healthy fats, and we still managed to save some for mom and dad. Barely.


Baked Veggie-Lentil Bites with Sesame Seeds and Olives

Ingredients:

  • ½ cup dry brown rice
  • ¼ cup dry red lentils
  • 1 medium potato
  • 2 medium-large carrots
  • ¾ cup sliced purple cabbage
  • ½ cup green peas (frozen, fresh, whatever)
  • ½ cup sesame seeds
  • 1 tbsp chopped fresh rosemary
  • 2 tsp oregano
  • 2 tsp mixed Italian herbs, or any combination of basil, thyme, and marjoram
  • a few grates of nutmeg
  • 2 cloves of garlic, minced
  • ½ onion, diced
  • 3 tbsp olive oil
  • 2 tsp lemon juice
  • salt and pepper to taste
  • 10 kalamata olives, pitted and slices into rings

Directions:

  1. Bring brown rice and 1 cup of water to a boil, cover, reduce heat to the lowest temperature, and cook until finished. Set aside.
  2. Meanwhile, put sesame seeds in a bowl with 1 cup of water to soak (activation!)
  3. Chop the cabbage into tiny pieces and grate the carrots as finely as possible
  4. Chop the potato and add to a pan with the lentils and ¾ cup water. Cover and cook until everything is soft. Leave them on the flame and mash them together with a fork, stirring to remove any excess moisture until you have a fairly uniform, sticky mixture. Set aside
  5. Preheat the oven to 180 C (360 F)
  6. In a frying pan, heat the oil and add the onions, garlic, and herbs. Sautee over low-medium heat until the onions are soft.
  7. Stir in the cabbage and cook, stirring, for a minute or two, until shiny.
  8. Add the rice and cook for another few minutes, stirring, until everything is coated with oil and herbs, but not dry.
  9. Mix everything together except for the sesame seeds and olives. Add salt and pepper to taste and mush everything together more, either with a fork or a hand mixer, until it is fairly pasty and most of the rice is crushed.
  10. Drain the water from the sesame seeds.
  11. When cool enough to handle, form golf-ball sized balls with the mush and roll each in the wet sesame seeds very lightly. Place on a baking sheet and stick an olive ring on top.
  12. Bake for about 30 minutes, checking with an occasional poke to test for solidity. They should be browned on the outside and still moist on the inside, with a strong enough outer layer to hold them firmly together. Enjoy!

Read more...

'Activating' Seeds and Nuts-An easy digestion aid

>> Sunday, January 18

Like most vegans, and for that matter, gluten-free folks too, I find that seeds and nuts are a huge part of my diet now (I am oh so joyous that I am not allergic to any! phew!). I really crave them, especially almonds, hazelnuts, and pumpkin seeds, all of which are very healthy and a good way for people with alternative diets to get healthy fats and essential nutrients. Plus they just taste so goood, and nothing enhances gluten-free anything like nut-meal or milk. Oh, *muah* "delicioso!"

In cooking, I rarely have a problem digesting nuts, especially when they are ground or made into milks. But lately, when I have gone over to my boyfriend's house, his roommate has a beautiful bowl of mixed nuts from her travels in Syria, and the temptation to eat a handful (every time I walk in the room) is too much to resist. Oh they're good alright. that's what I keep telling myself when i wake up at 5 in the morning with a lance in my abdomen! "Shhhhh, my dear digestive tract, you wouldn't believe the flavors tongue up here is experiencing!" But my lower organs are just not happy with whole, raw nuts, or even roasted whole nuts.

I started looking around for a solution and found one that sounds surprisingly simple. so far I have only tried it with pumpkin seeds, but the result was a seed that was plump, juicy, and even better than the average dried pumpkin seed. And I didn't have a twinge of cramping or any bloating after eating (ahem, possibly too) many. Woah...really? Truly. But don't take my word for it, try it yourself-and try any seed or nut.

The science here is simple. Usually when we eat seeds and nuts they are dormant, perceiving in their little seedy senses that it's winter or some insanely dry spell that's not suitable for growth. So none of the living nutrients we find in plants are released. However, if you soak the seeds in good clean water, you have cleverly tricked them into thinking it's spring-the first rains. They begin to germinate, though it's not visible from the outside at all. The wonder of it is, they taste somehow better, though they retain the same flavor and crunch, look the same, and have gotten rid of most of the digestion-inhibiting factors on their own, because they are now focused on growing-which makes them all the more nutritious too.

Activated Seeds and Nuts

Ingredients:

  • some raw, whole, organic nuts
  • some fresh (spring, filtered, etc.) water, room temperature
  • a clean jar/bowl
Directions:
  1. Just put your nuts in some water and soak for:
almonds/hazelnuts: 12 hours +
cashews/walnuts/pecans: 2-4 hours
brazils/macadamias: 6-12 hours
For seeds, the soak times are usually less, 2 hours or so.

If you want them salted or flavored, drain off the water and add whatever flavor you want while they're still wet. dry them on a tray in the oven at the very lowest temperature (you should only make it hot enough to imitate sunlight, so you don't kill the nutrients you've just accessed) until dry to the touch. Enjoy!
Notes:
There are many websites with helpful tables of detailed soak times. At the moment, I can only find this on in my history. 12-24 hours for most hard nuts seems fine. soft nuts like cashews and walnuts, about 4. For seeds, use your judgement and a little less time.
Vegan and Vegetarian Health guide: Nuts and Seeds


Read more...

  © Blogger templates Shiny by Ourblogtemplates.com 2008

Back to TOP